MBA13/2012: OSX + Win7 + Shared exFAT
Posted by Chainfire on 13-07-2012 at 15:10:00 - Comments: 652 - Views: 69523
Tags: Windows 7 Mac OS X Good news
Tags: Windows 7 Mac OS X Good news
13" MacBook Air 2012: Mac OS X + Windows 7 + shared exFAT partition
This is easier than it looks, and much easier than some other sites make it out to be. It took me longer to type this article than it took me to do. Actually the whole reason I'm even bothering typing this up, is because I've found other guides to be incomplete, confusing, wrong, and/or simply not working for me.
This article comes without any warranties of any kind - it's possible to do all this, but it's tricky, you should know what you're doing, it's possible to mess this up and lose all your data.
Note that I tested this with the Windows 7 SP1 ISO, I'm not sure how well it works with "plain" Windows 7.
Intro (TL;DR)
I was in need of an ultrabook for the holidays with decent specs, so I ended up with a Macbook Air, the 13" 2012 model, with 8gb RAM and a 512gb SSD.
I have nothing against Mac OS X, but I'm not used to using it, and I don't think the best time to learn is trekking through a different continent. So I want to be able to use Windows 7. But I also plan on using OS X in the future, so I also want a shared partition.
As you may be aware, OS X (Lion) can read NTFS, and Windows 7 can read HFS (with the latest Boot Camp drivers). Neither can write the other though, at least not without going through nasty hoops that may leave you with corrupted data.
The solution is a third partition, formatted as exFAT. We don't want to use the widely supported FAT32, because - let's be honest here - that mkv that you're going to want to watch is going to be 4.5gb, and that's just not going to fly on FAT32.
As my unit is a MacBook Air, it doesn't come with an optical drive, so I would like to keep the recovery partition intact. We also have the required EFI partition. So what we want to end up with are the following partitions:
(1) EFI
(2) OS X (normal installation)
(3) OS X (recovery installation)
(4) Windows 7
(5) Shared
This looks straight-forward enough, but all of these need to be "primary" partitions in "MBR speak" to work, and you can only have four of those! And Boot Camp will insist on creating only one large extra partition for your Windows 7 installation. And, Windows 7 doesn't really want to format partitions on an internal drive as exFAT. And, ... the list goes on.
You might have thought of all the above. Forget about them, we will work around them.
Boot Camp
What we need to do first is make our bootable USB stick containing Windows 7. So get your Windows 7 ISO somewhere, a sufficiently large USB stick, and start the Boot Camp utility on OS X (Launchpad -> Utilities -> Boot Camp Assistant). The first thing it will want to do is create that bootable USB stick. Just a wait a while and let it do it's thing.
Next, it will want to repartition your hard disk. Cancel this operation and leave Boot Camp Assistant. Didn't cancel it succesfully ? No problem, reboot your device, start Boot Camp Assistant again, and use the option to remove Windows.
Disk Utility
Now we want to create our own partitions. Start Disk Utility (Launchpad -> Utilities -> Disk Utility) and select your hard drive, then go to the Partition tab. If it shows you a big fat BOOTCAMP partition, go back to Boot Camp and remove it.
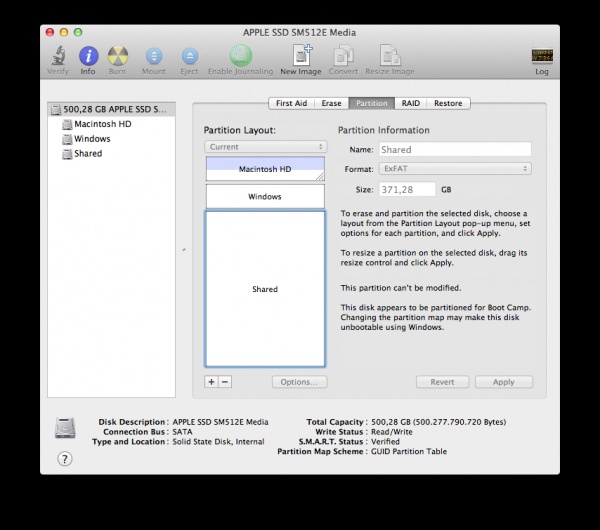
I have a 512gb SSD in my MBA, and I decided I want to use 64gb for OS X, 64gb for Windows 7, and use the rest as shared storage. This required a little fiddling, as Disk Utility auto adjusts sizes (really annoying, that).
Anyway, you can use the + button below the partition list to add a partition (you might need to shrink other partitions first). Add two partitions, set both of them to exFAT and name them "Windows" and "Shared" respectively.
It is important you select exFAT for both of them, and give them recognizable names!
The end result looked like this for me (click for larger view):
Click Apply to save, and we're ready to modify our MBR.
gptsync
I mentioned before we have a four primary partition limit. This MacBook uses EFI, and Mac OS X uses GPT for partitions, while Windows 7 uses MBR for partitions. GPT is much newer and capable and can thus support everything we are trying to do. Not so with MBR.
We should think of GPT as master, and MBR as slave. This is also why you should never modify MBR on this system. Modify GPT, then "translate" that. In fact, after we're doing with installing Windows 7, I would definitely make sure you have your complete machine fully backed up before ever messing with partitions again. Even with the right tools, it has become a whole lot more dangerous and higher chances of data loss than before.
Because we have five partitions but can only use four for MBR, we are going to deliberately make the MBR "out-of-sync" of GPT. In essence we are going to hide one of the GPT partitions from MBR. This sounds like voodoo, but it is pretty straightforward.
First, we need to get gptsync: http://www.insanelymac.com/forum/index.php?showtopic=177505. Download and install it.
After installation, we need to open a terminal (Launchpad -> Utilities -> Terminal), and execute the following command:
For me, the output was as follows:
Our hard disk shows up as "/dev/disk0" and the USB stick with Windows on it shows up as "/dev/disk1".
We can see that our Mac OS X partition is number 2, Windows is number 4, and Shared is number 5.
What we are going to do is copy these partition to the MBR partition table used by Windows. We can do that by issuing this command:
Note the "2-", "4-" and "5-" parts. These are the partition numbers we spotted above. Make sure these are correct for you.
This was the output for me:
As you can see, between the "current" and "proposed" MBR partition table, "MacOS X Boot" has disappeared. That is the Mac OS X recovery partition that Windows doesn't need to know about. It'll show up as unallocated space in Windows - don't touch it!
You will also see EFI is being added even though we didn't add it's partition number. That's ok and expected behavior, don't worry about.
After you confirm this new MBR partition table, we can continue on.
Installing Windows 7 SP1
Remember that USB stick we had Boot Camp Assistant make with Windows 7 on it ? Now's the time to use it. Restart your MacBook, and hold the option key while booting, this will bring us to the boot menu. Select the USB stick (the icon is different than the other options, if you happen to get two options with the same name) and Windows 7 installation will start.
You will probably be presented with the option to either upgrade or do a custom install of Windows 7. Select the custom install option. You will be presented with a list of partition to install Windows 7 to. You will spot some unallocated space (the hidden partition) as well.
It is of the utmost importance that you do not modify the partition table. I cannot stress this enough.
One of the partitions should be labeled as "Windows", as we named this partition earlier (as we made this partition exFAT, the Windows installer can read the name). Confirm that its (roughly) the size you selected for your Windows partition. When you select it, the installer will complain that that is not a place Windows can be installed to. See if below the partition list is the option to format. If not, there will be the option to show options - after you click that the format option will become available. So make sure the "Windows" partition is selected, and choose format. That partition will now be formatted as NTFS and Windows will be installed to it.
Make sure you did not touch any of the other partitions.
Note that during the entire process, because we chose this way to install Windows 7 instead of the normal way, you may have to manually boot into Windows 7 (either partition or USB stick) a couple of times for the install to complete, as the automatic reboots during installation might start Mac OS X instead.
When installation is complete ...
Make sure to navigate to the USB stick containing the Windows 7 installer. Boot Camp will have added a support folder to the stick containing all the drivers for the MBA. You should definitely install those.
After that - and running Windows Update - you are done. You should now have a MacBook that can run Mac OS X, Windows 7 and has a shared exFAT partition between the two, without sacrificing anything. Not even the Mac OS X recovery partition - as is often advised by other guides.
This is easier than it looks, and much easier than some other sites make it out to be. It took me longer to type this article than it took me to do. Actually the whole reason I'm even bothering typing this up, is because I've found other guides to be incomplete, confusing, wrong, and/or simply not working for me.
This article comes without any warranties of any kind - it's possible to do all this, but it's tricky, you should know what you're doing, it's possible to mess this up and lose all your data.
Note that I tested this with the Windows 7 SP1 ISO, I'm not sure how well it works with "plain" Windows 7.
Intro (TL;DR)
I was in need of an ultrabook for the holidays with decent specs, so I ended up with a Macbook Air, the 13" 2012 model, with 8gb RAM and a 512gb SSD.
I have nothing against Mac OS X, but I'm not used to using it, and I don't think the best time to learn is trekking through a different continent. So I want to be able to use Windows 7. But I also plan on using OS X in the future, so I also want a shared partition.
As you may be aware, OS X (Lion) can read NTFS, and Windows 7 can read HFS (with the latest Boot Camp drivers). Neither can write the other though, at least not without going through nasty hoops that may leave you with corrupted data.
The solution is a third partition, formatted as exFAT. We don't want to use the widely supported FAT32, because - let's be honest here - that mkv that you're going to want to watch is going to be 4.5gb, and that's just not going to fly on FAT32.
As my unit is a MacBook Air, it doesn't come with an optical drive, so I would like to keep the recovery partition intact. We also have the required EFI partition. So what we want to end up with are the following partitions:
(1) EFI
(2) OS X (normal installation)
(3) OS X (recovery installation)
(4) Windows 7
(5) Shared
This looks straight-forward enough, but all of these need to be "primary" partitions in "MBR speak" to work, and you can only have four of those! And Boot Camp will insist on creating only one large extra partition for your Windows 7 installation. And, Windows 7 doesn't really want to format partitions on an internal drive as exFAT. And, ... the list goes on.
You might have thought of all the above. Forget about them, we will work around them.
Boot Camp
What we need to do first is make our bootable USB stick containing Windows 7. So get your Windows 7 ISO somewhere, a sufficiently large USB stick, and start the Boot Camp utility on OS X (Launchpad -> Utilities -> Boot Camp Assistant). The first thing it will want to do is create that bootable USB stick. Just a wait a while and let it do it's thing.
Next, it will want to repartition your hard disk. Cancel this operation and leave Boot Camp Assistant. Didn't cancel it succesfully ? No problem, reboot your device, start Boot Camp Assistant again, and use the option to remove Windows.
Disk Utility
Now we want to create our own partitions. Start Disk Utility (Launchpad -> Utilities -> Disk Utility) and select your hard drive, then go to the Partition tab. If it shows you a big fat BOOTCAMP partition, go back to Boot Camp and remove it.
I have a 512gb SSD in my MBA, and I decided I want to use 64gb for OS X, 64gb for Windows 7, and use the rest as shared storage. This required a little fiddling, as Disk Utility auto adjusts sizes (really annoying, that).
Anyway, you can use the + button below the partition list to add a partition (you might need to shrink other partitions first). Add two partitions, set both of them to exFAT and name them "Windows" and "Shared" respectively.
It is important you select exFAT for both of them, and give them recognizable names!
The end result looked like this for me (click for larger view):
Click Apply to save, and we're ready to modify our MBR.
gptsync
I mentioned before we have a four primary partition limit. This MacBook uses EFI, and Mac OS X uses GPT for partitions, while Windows 7 uses MBR for partitions. GPT is much newer and capable and can thus support everything we are trying to do. Not so with MBR.
We should think of GPT as master, and MBR as slave. This is also why you should never modify MBR on this system. Modify GPT, then "translate" that. In fact, after we're doing with installing Windows 7, I would definitely make sure you have your complete machine fully backed up before ever messing with partitions again. Even with the right tools, it has become a whole lot more dangerous and higher chances of data loss than before.
Because we have five partitions but can only use four for MBR, we are going to deliberately make the MBR "out-of-sync" of GPT. In essence we are going to hide one of the GPT partitions from MBR. This sounds like voodoo, but it is pretty straightforward.
First, we need to get gptsync: http://www.insanelymac.com/forum/index.php?showtopic=177505. Download and install it.
After installation, we need to open a terminal (Launchpad -> Utilities -> Terminal), and execute the following command:
Code
#
1
sudo diskutil list
For me, the output was as follows:
Code
#
1
/dev/disk0
2
#: TYPE NAME SIZE IDENTIFIER
3
0: GUID_partition_scheme *500.3 GB disk0
4
1: EFI 209.7 MB disk0s1
5
2: Apple_HFS Macintosh HD 64.0 GB disk0s2
6
3: Apple_Boot Recovery HD 650.0 MB disk0s3
7
4: Microsoft Basic Data Windows 64.1 GB disk0s4
8
5: Microsoft Basic Data Shared 371.3 GB disk0s5
9
/dev/disk1
10
#: TYPE NAME SIZE IDENTIFIER
11
0: FDisk_partition_scheme *31.9 GB disk1
12
1: DOS_FAT_32 WININSTALL 31.9 GB disk1s1
Our hard disk shows up as "/dev/disk0" and the USB stick with Windows on it shows up as "/dev/disk1".
We can see that our Mac OS X partition is number 2, Windows is number 4, and Shared is number 5.
What we are going to do is copy these partition to the MBR partition table used by Windows. We can do that by issuing this command:
Code
#
1
sudo gptsync /dev/disk0 2-af 4-07 5-07
Note the "2-", "4-" and "5-" parts. These are the partition numbers we spotted above. Make sure these are correct for you.
This was the output for me:
Code
#
1
Current GPT partition table:
2
# Start LBA End LBA Type
3
1 40 409639 EFI System (FAT)
4
2 409640 125409639 Mac OS X HFS+
5
3 125409640 126679175 Mac OS X Boot
6
4 126681088 251940863 Basic Data
7
5 251942912 977104895 Basic Data
8
9
Current MBR partition table:
10
# A Start LBA End LBA Type
11
1 1 409639 ee EFI Protective
12
2 409640 125409639 af Mac OS X HFS+
13
3 125409640 126679175 ab Mac OS X Boot
14
4 126681088 251940863 07 NTFS/HPFS
15
16
Status: MBR table must be updated.
17
18
Proposed new MBR partition table:
19
# A Start LBA End LBA Type
20
1 1 409639 ee EFI Protective
21
2 409640 125409639 af Mac OS X HFS+
22
3 126681088 251940863 07 NTFS/HPFS
23
4 251942912 977104895 07 NTFS/HPFS
24
25
May I update the MBR as printed above? [y/N]
As you can see, between the "current" and "proposed" MBR partition table, "MacOS X Boot" has disappeared. That is the Mac OS X recovery partition that Windows doesn't need to know about. It'll show up as unallocated space in Windows - don't touch it!
You will also see EFI is being added even though we didn't add it's partition number. That's ok and expected behavior, don't worry about.
After you confirm this new MBR partition table, we can continue on.
Installing Windows 7 SP1
Remember that USB stick we had Boot Camp Assistant make with Windows 7 on it ? Now's the time to use it. Restart your MacBook, and hold the option key while booting, this will bring us to the boot menu. Select the USB stick (the icon is different than the other options, if you happen to get two options with the same name) and Windows 7 installation will start.
You will probably be presented with the option to either upgrade or do a custom install of Windows 7. Select the custom install option. You will be presented with a list of partition to install Windows 7 to. You will spot some unallocated space (the hidden partition) as well.
It is of the utmost importance that you do not modify the partition table. I cannot stress this enough.
One of the partitions should be labeled as "Windows", as we named this partition earlier (as we made this partition exFAT, the Windows installer can read the name). Confirm that its (roughly) the size you selected for your Windows partition. When you select it, the installer will complain that that is not a place Windows can be installed to. See if below the partition list is the option to format. If not, there will be the option to show options - after you click that the format option will become available. So make sure the "Windows" partition is selected, and choose format. That partition will now be formatted as NTFS and Windows will be installed to it.
Make sure you did not touch any of the other partitions.
Note that during the entire process, because we chose this way to install Windows 7 instead of the normal way, you may have to manually boot into Windows 7 (either partition or USB stick) a couple of times for the install to complete, as the automatic reboots during installation might start Mac OS X instead.
When installation is complete ...
Make sure to navigate to the USB stick containing the Windows 7 installer. Boot Camp will have added a support folder to the stick containing all the drivers for the MBA. You should definitely install those.
After that - and running Windows Update - you are done. You should now have a MacBook that can run Mac OS X, Windows 7 and has a shared exFAT partition between the two, without sacrificing anything. Not even the Mac OS X recovery partition - as is often advised by other guides.
